Showing posts with label My Projects. Show all posts

Monday, December 24, 2012

"Snow" Covered Candle Holder

My Mom loves candles and I saw this candle holder on Pinterest and a lightbulb went off.

To make this candle holder you need:
Mod-Podge (Homemade version here.)
Candle Holder
Large Plate
Epsom Salt
Paint Brush

First pour the Epsom Salt onto the large plate. Grab the candle holder and using the paintbrush, apply a layer of the glue mixture onto the candle holder. Then sprinkle the Epsom Salt onto the glue.

I put a layer of glue on the bottom, added the salt, then painted the middle, added the salt, and finally the top and rim. It is a very straightforward process. Just be sure not to touch the outside edges or you will have to do touch-ups later.  Also don't worry about ruining the paintbrush. It washed right out under warm water. You will be fine as long as you don't let the glue dry on the paintbrush. This only took me 10 minutes to do.


 I thought it turned out very well and definitely will be making more.
Signature

Christmas Snowmen

I love this project. Last year I made 2. This year I tripled that and have a little snowman army :)

 Here is what you need to make these little beauties:
1 white sock
1 pair of decorative socks
rice
rubber bands
Hot glue gun
Any other details such as string, buttons,beads, etc
First cut the sock like so. Make sure the white sock is the one with the very long tube, not the ankle socks. Throw away the bottom part.
 Next, turn the tube inside out and tie a rubber band around the top.
Turn the tube back inside out and begin filling it with rice.
 I pick up the sock by the rim and gently shake it and bounce it upside down to let the rice settle and form the snowman naturally. About an inch from the top, rubber band it off.
Next cut up the decorative socks like so:
Put the sock around the snowman body.
Next add the hat.
Using embroidery floss, tie the top of the hat to create a poof and use it around the body to help separate the body into sections. You can push the rice around and mold it to give it the shape you want.

Now add the details. I used black seed beads for the eyes and colored the tip of a toothpick orange for the nose. I also used some buttons. I've seen people use sharpie dots for the eyes, small triangle carrot buttons for the nose and ribbon used to add details. By the way, don't try and use super glue. It just gets absorbed into the sock and it leaves a spot. The hot glue gun works the best. This part is all about creativity and using what you got :)

Here are all my snowmen.

That's all there is to it. Have fun and be creative!
Signature

Saturday, November 24, 2012

Beaded Ornament Cover Tutorial

I've made a few of these ornament covers and they are very simple, but can be time consuming. You'll need:
  • seed beads
  • thread
  • scissors
  • beading needle or thin sewing needle
I am using a light pink and a brown.
First thread your needle. I don't tie it off. I just put the needle about 3 inches from the end like so.
Then put on 2 beads of your main color and 1 of your accent color until you have 16 accent colors.
Make it a loop by tying the thread.
Then you put on 5 beads of your main color and 1 accent color until you have 13 sets of your main color. Don't put on the last accent color. Next go through the 4th accent bead from the top.
 Add 5 beads of your main color,1 accent, and 5 more mains. Then skip an accent bead and go through the one above it
Continue this pattern until the top of the row and add only 5 main colors,  and go through the accent color in the loop.
Now add 5 main colors,1 accent color and 5 main colors and go through the next accent bead.
Continue down the row and after you go through the last accent bead add 5 mains, 1 accent, 5 mains, 1 accent, and 5 mains and go through the next accent bead. Continue this way all the way up, down, and around the circle. After the first two rows, you should be able to do this very easily without the instructions, but if you need them that's ok too :)
When you get all the way around to the last accent bead on the top circle you'll have a big net like this.
This next part is easier than it sounds and it's hard to explain, so bear with me. When you get to the last accent bead on the last row, add 5 mains, 1 accent, and 5 mains and go through the corresponding accent bead on the other side of the net. This is where we "sew" up the back.
Add 5 main colors and go through the next accent bead on the opposite side. It kind of "zips" up. When you get to the very top, add the 5 main colors and go through the very first accent bead on the top circle and tie off.
I don't have a bulb on hand to show you this finished netting, but here is one I've done before. By the way, this was a smaller bulb, so the netting hung down. A bigger bulb will make the netting hug the bulb tighter.
This is a neat project and I really like the finished look, especially on the tree. It's time consuming, but totally worth it. Have fun :)
Signature

Sunday, November 11, 2012

My Day and a Ribbed Hat

   Today has been FUN! Actually, not really. So far I've watched Duck Dynasty, which is so funny, and I would recommend anyone to watch it. Now I'm halfway through the second showing of The Green Mile, which is one of my favorite movies. I decided to watch it a second time, cause honestly I don't want to look for the remote. I've read the book and it surpasses the movie greatly, and the movie is pretty good. It follows the main story line of the book and doesn't change it up too much. The book just had a lot more explanations and details.
   I've also been working on another hat. This one is pink and charcoal gray as well, but I made ribbing. It looks very flat when not worn, but I like this style so much more than the other ones I've done :)

Signature

Saturday, November 10, 2012

Knitted Hat

So it's getting pretty cold here and I'm in the knitting mood. I knitted a hat today for our friend's daughter and another hat is 1/4 way done. I will post pictures of that finished hat later. I think they're adorable and not too shabby considering I've only been knitting for a little over a month and this is only my second hat (and first pom-pom) :)

Signature

Friday, November 2, 2012

Halloween Pirate Costume

Well, I don't celebrate Halloween so I don't have a lot of choices when it comes to dressing up. My aunt threw a little Halloween party and I decided to put something together so I went as a pirate, considering I already had most of the pieces for it. Anyone can make a pirate costume fairly quickly. All you need is a white long sleeve shirt, red bandana, black or brown skirt (or pants) and some kind of belt like I have in the picture. I don't know how to describe it. You can also make the vest and eye-patch by going here. If you're a girl accentuate with hoops, and any loose jewelry such as chains or bangles. Red lipstick is usually in the pirate description as well as dark eyeshadow or eyeliner. By the way, it can be a little smudgy in some places. Pirates weren't the cleanest people. By the time I was ready I had a nice little costume.
Signature

Charming Little Ghosts

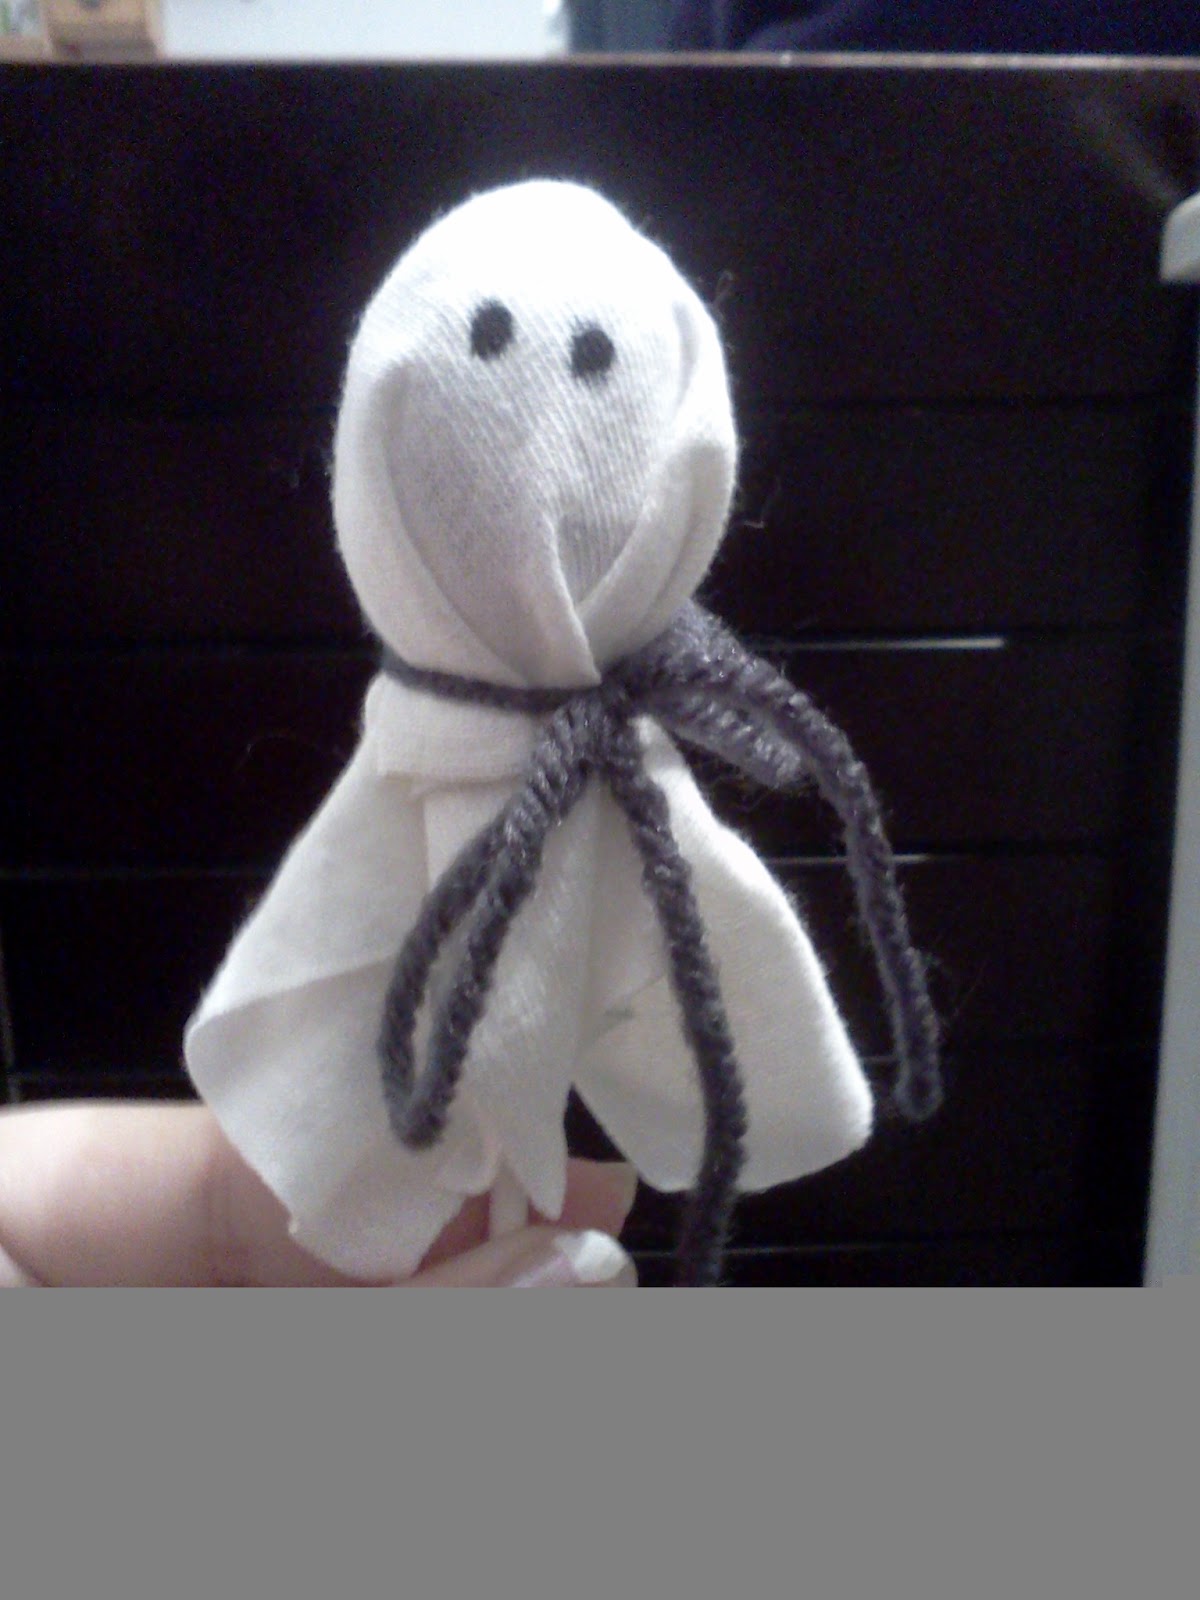
I know I'm late posting this for Halloween but it's ok. Anywhoo, here are some little lolli-pop ghosts I made for some of my friends.
Definitely not the most spectacular thing, but they're so cute! To make these little ghosts I picked up some lolli-pops. I used Charms (hence the post title)..Yes, I am that clever. Just kidding. Anyways I used plain cotton fabric and cut out pieces 6"x6". Just cut out how many you need and now just wrap the fabric around the lolli-pop. Use ribbon or a cute yarn and tie it around the base of the lolli-pop and use a sharpie to draw on little eyes. That's all there is to it. I didn't have a Halloween-y yard or ribbon, so I just used the plain gray.
Here is my little bag of ghosts :)

Signature

Sunday, October 28, 2012

Cute Fabric Flowers

Yesterday night was homecoming and I needed a little something for my hair. When I was at the store I saw flower barrettes and knew I could make them. When I got home I created these little beauties.
I didn't have a lot of time, so I didn't take pictures of each step but they were very easy to make. The most time consuming part was cutting out all the circles and scalloping them. I traced around a coffee cup to make the circles and then just scalloped them to have a flower with 5 petals. You also need a little bit of felt or material a little larger than a quarter. After you have 8 flower cutouts just take 1, fold it in half, then half again and put hotglue on the tip and glue it to the center of your little circle.You'll want to glue the next piece down, but glue it so it overlaps the previous petal. I realize now it's hard to explain without pictures. I'll have to make another sometime soon to get pictures. Anyways, after I had the flower done I glued sequins to the center to match my dress (my dress is black and sequin-y). Finally I glued a bobby pin to the bottom and voilá!
I think they turned out pretty good considering I made them on a whim and rushed the whole time. I will make a full tutorial on how to make them sometime soon...I hope :)


Signature

Friday, October 26, 2012

Quick Pirate Vest


So it's Class Day at school and this year we're good ole' pirates.. Arrggghhh!! This took me about 45 minutes to complete. I started out with an XL T-shirt, which on me is HUGE. I had to downsize it quite a bit! I had a white shirt and black jeans and when I looked up pirate costumes most had a red or reddish vest. That being said, this was the only shirt that I could find that I was "allowed" to cut up. I felt guilty for it being a US Freedom shirt, but it was this or nothing. So here goes.


This was only meant to be a quick costume to I didn't really measure anything. First I turned it inside out and cut down the middle of the shirt. Only cut the top layer. Not the bottom. Then cut off the sleeves and collar. I honestly have NO idea why it looks so pink...
Then I turned it it right side out and put a pin where I was going to sew a seam and make it smaller. I shortened the length of the shoulders and sides. I also marked where I wanted the curve of the "U" to lie and cut it out.
Then I turned it back inside out and tried it on. Make sure you don't stick yourself with the pins. Make any adjustments if you need to.When you try it on, make a note of how short you want it to be and mark it with a pin.
Now cut a little below your pin. I cut about an inch below it.. Next I sewed the shoulder part.
And the bottom hem of the vest. By the way this picture shows the excess fabric cut off, but oh well..
Cut off all excess fabric. I cut about 1/2 an inch away from my seam.


 Add some "pirate-esque" buttons. I luckily had 3.
My finished vest. I only sewed the bottom hem. I didn't see the need for anything else. I still looks good and hey pirates weren't the fanciest people so it really doesn't matter. You can sew all the seams though if you wish. In the picture you can kind of see the emblem from the front of the shirt but in usual light I didn't see anything.
Not the best pirate costume compared to my friends, but oh well! It was fun!
Oh and I also made a little eye-patch. I just free drew the shape of an eye-patch on some black and white fabric, sewed them together and turned right-side out and added the red top-stitching. Then I just poked two holes in the white material on the back and threaded some yarn through. As I said, I wasn't going for perfect work here. I had only a little time to be crafty and this is what resulted.
  Pirate on folks :)


Signature